.breadcrumbs { padding:5px 5px 5px 0; margin:0;font-size:95%; line-height:1.4em; border-bottom:4px double #e2e7b4; } .breadcrumbs a { text-decoration:none; color: #000000; }

G.f.a Productiom

DCM Galeri Headline Animator

Showing posts with label Beats. Show all posts

Friday, September 21, 2012

Teknik bermain Fruty Loops untuk pemula

Tutorial fl studio untuk pemula

Langsung aja bro..Kalo biasanya ane posting tentang seputar menjadi DJ, kali ini ane share tentang tutorial fruity loop 9 untuk pemula atau bagi teman-teman yang sama sekali belum tahu apa tentang fl studio. Yang mungkin ente bingung dan pusing lihat banyaknya tombol di software pada saat pertama kali. Bagi yang sudah sedikit paham tentang fl studio silahkan baca article tentang membuat lagu dj dan nge-remix.

Apa itu Fl studio ?
Software yang bisa kita gunakan untuk membuat lagu, mencampur / remix, merekam (multy-track) yang berkualitas profesional (32 bit )  mempunyai fitur lengkap serta support vst, midi, hardware lainnya. Hasil lagu pun dapat kita export ke wav, mp3, ogg, mid. Jadi anggaplah fl studio itu seperti sebuah ruangan yang penuh alat-alat musik yang bisa kita gunakan untuk membuat lagu atau ngeremix ,terus tinggal pilih aja instrument-nya..

Untuk mempermudah pemahaman di bawah ini ane ringkas bagian-bagian yang penting pada software fl studio 9. Yaitu menu-menu:


a. File browser
b. Channel
c. Mixer
e. Playlist

lihat gambar plylist studio di bawah.

A. File browser : Menu ini berisi folder atau tempat dimana samples default dan lainnya di fl studio yang tersimpan. Letaknya ada di sebelah kiri software. lihat videodisini. Folder lengkapnya di bawah ini:

Plugin database
Plugin presets
Project bones
Recorded
Rendered
Scores
Packs
Sliced beats
Soundfonts
Speech
User
Channel presets
Collected
Impulses
Misc
Mixer presets


Sebagai langkah awal yang penting adalah memahami isi folder PACKS. Silahkan ente buka software Fl studio dan langsung klik folder packs, buka / klik folder drumkit dan yang lainnya..Instruments itulah yang nanti bisa ente gunakan untuk membuat lagu atau nge-remix, sebelum menggunakan samples tambahan seperti diweb ini.

B. Channel.

Menu Channel berisi instrument  yang akan kita buat / susun nada-nadanya menjadi lagu. Instrument bisa berupa file wav, mid, soundfont, ogg, atau Plugin tambahan (contohnya: nexus, v-station vst ). Lihat contoh bagaimana memasukan channel/instrument di article cara masukin audio.

 C. Mixer

Mixer kita gunakan untuk proses mixing, balancing setiap instrument di channel yang telah kita buat. Contohnya : kick, snare, hi hat, clap, bass. artinya setiap instrument dapat kita set ke mixer dan dapat kita tambahkan plugin-plugin / effect agar kualitas suaranya bagus (tidak mendem). Jumlah track mixer mencapai 99. Jadi kita lebih mudah mengatur output. Lihat gambar:

fl studio mixer
Cara set ke mixer: Klik kiri kick (samples), klik pada angka 1 seperti gambar, kemudian klik tahan mouse, selanjutnya tinggal pilih akan di set ke mixer nomer berapa.

D. Playlist

Di sinilah kita mengatur dan menyusun setiap nada-nada, audio,loop, vocal, drum kit, dan lainnya menjadi lagu yang kemudian kita export ke mp3, wav, ogg. mid.Lihat gambar di bawah yang bertuliskan playlist (song mode).

playlis fl studio

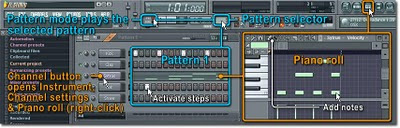
Ups..Hampir lupa soal Pattern yang terdapat di fl studio v.7, 8 - 9.1 pada menu playlist. Pattern simplenya hanya mewakili channel yang namanya bisa kita rubah / rename (klik kanan pattern pilih rename ganti terserah ente, misal: pattern 1 di ganti menjadi "drum kit". Pattern juga bisa gunakan untuk mengatur/menyusun instrument lagu karena fungsinya hampir sama dengan playist track atas.

Pattern juga lebih memudahkan kita untuk memisah instrument / samples sehingga pada saat menyusun ke playlist menjadi mudah. Misalnya:

Patern 1 : drum kit
Pattern 2 : bassline
dan lainnya terserah ente yang penting mudah. Agar lebih paham lihat gambar di bawah ini:


Jangan lupa untuk menyusun playlist set Mode - menjadi "song". Sedangkan untuk memutar per-pattern pilih mode "Pat".

Ok..sampai disini dulu ya,bro tutorial fl studio untuk pemula-nya..tau nih mudeng apa gak..? yang gak mudeng pelajari satu-satu biar gk puyeng dan terus praktekin. Kurang lebih seperti itulah untuk mengenal fl studio secara simple. Gimana menurut

Lihat tutorial lain tentang Recording

Belajar dasar FL Studio

Tutorial FL (Fruity Loops) ini saya tulis untuk orang yg ingin belajar FL dengan mudah. untuk membuat sampling maupun lagu…
cara pertama yang harus kamu lakukan adalah membuka aplikasi FL seperti Berikut….
untuk awalnya saya akan menjelaskan fungsi-Fungsi pada FL ( Fruity Loops )….
1. Toolbars
pada menu file kita dapat melakukan open dan save project serta import dan export file…
untuk menu edit kita bisa melakukan edit right left atau randomize ( acak untuk not yang ada di pattern )
untuk gambar pattern seperti ini…
disitu loe bisa masukin sound atau suara yg loe mau.. caranya tinggal klik aja tuh pattern misal : kick… loe ingin ganti.. tinggal loe pilih di drive mana loe simpan file kick yg akan loe masukkan ke pattern sound…. ok nanti kita bahas ya…. kita bahas fungsi toolbars biar loe gak bingung nantinya….
pada menu view : itu gunanya untuk loe mau memilih aplikasi yg akan loe timbulkan, misalnya browser, pattern dll.
di menu option itu yg penting… loe  harus melakukan edit sound atau latency atau buffer agar kualitas suaranya ok dan tidak skip pada saat memutar banyak file…..
ke 2.  Browser
di browser ini terdapat banyak sekali pilihan seperti channel prest clipboard file, effect, sound atau suara2, fpc, speech, dll
nah untuk memasukkan suara ke pattern,, loe bisa memilih dari browser, setelah yg loe pilih ketemu,, klik kanan pada mouse insert new atau menimpa sound yg di pattern ….. sudah jelas kan
nah selanjutnya ini gambar yaitu untuk kita memsasukkan file project audio.. caranya klik kanan di kolom pattern. trus pilih insert audio file dan pilih audio yg loe mau masukin broo.. gampangkan…. kalau leo dah masukin tinggal loe membuat pattern drum atau instrument lain dengan cara
membuat piano roll.. nanti  kalau udah jangan lupa loe klik si bars patter yang di bawah audio track seperti gambar balok kayu yang di atas ini loh….
cara mebuka piano roll klik kanan di pattern ,, pilih piano roll tuk membuat notnya ( jika gak ada keyboard controller)
nih gambarnya …dah jelas keliahatan kan… setelah loe  dah masukin dan membuat pattern drum atau instrument lain.. saatnya loe memasukkan effect ke masing pattern yg loe mau,,, misalkan drum…. klik di drum truss setelah keluar jendela baru yang ada tulisannya fx. doublke klik maka akan keluar mixer, biar gampang nih contohnya :
trus insert di kolom fx mixer itu,,, jgn lupa loe mau kasih effect di chanell berapa harus loe ingat biar gak bergabung sama instrument yg lain….
cara masukin effect loe klik aja tombol yg ada di fx mixer, setelah kebuka aplikasi nya, pilih dech semau loe apa yg loe suka.. misal fruity 7 band equalizer, dll
nih contoh fx yg dah kebuka :
nah kalau udah selesai loe tinggal export aja mau jadi mp3 atau wave di menu file….. dan jadilah musik atau sampling loe
1. catatan yang penting kalau loe mau buat sampling jangan lupa masukin yg akan di jadikan guide atau penuntun lagu… kalau ada yg mau di potong langsung aja di potong di kolom pattern track dengan cara menklik gambar pisau…. trus pilih batas yg mau di potong…. kalau sudah dan loe mau memperbanyaknya.. tinggal klik lagi gambar sapu.. klik audio track yg akan di perbanyak.. trus klik di kolom track yang kosong.. serta tarik aja… tapi jangan lupa hold mouse ya….
Selamat Berkarya dan Bermusik Teman …………..


Lihat tutorial lain tentang Recording

Thursday, April 26, 2012

Tutorial Adobe Audition 3.0

About Adobe Audition 3.0

Adobe Audition 3.0 is one of world most popular software's for music industry. It is very simple and easy to use.
Adobe Audition 3.0 gives you much opportunities to work with music. Its have 13 effect categories and more then 100 effects. You can also upgrade your adobe audition software with some plug ins. Adobe Audition have option to install VST and DIRECTX plug ins. You can record over one hundred audio tracks and edit it at same time. Adobe Audition 3.0 gives you opportunity to become professional music producer.

Adobe Audition/Cool edit Pro Mastering Tutorial

How To Record Your Vocals
Well, most of you think "njea how simple is that", well you are wrong.
If you recording in adobe audition 3.0 I will help you to set up your records. Follow this steps :


First thing you have to do is arm yours track. Just click Red "R" button on track you want to record.
Check your record device option. If you want quality sound, you have to chooseMONO recording.
When you do that, you have to record 3 tracks one below other. But you must record ON THE SAME WAY YOU RECORD FIRST ONE.

Example:

I armed first track hit the record button and sing : "LAA LAAA LAAA"
Then I armed second track, hit record button and sing "LAA LAAA LAAA"
Then I arm 3th track, hit record button and sing "LAA LAAA LAA.You get it ? I hope you do :)
That's way you record yours vocals..

NOTE : The 1st track you record must be on center, Second one YOU MUST pan it to 40 degree to LEFT, And 3d one YOU MUST PAN 40 degree to RIGHT so you can get that very good stereo sound.

Mastering Your Vocals
For good quality of yours vocal tracks you have to add some effects.
Follow me :
First effect you want to do is choose witch track you want to edit. When you chose then double-click on it. Now you get your self to edit mode. Mark whole track. First effect is Amplitude and Commpression -> Amplify/Fade process. When you get there choose Center Wave. Hit OK.
Next one is Dynamic Processing ->Effect preset->Rap Presence(If you are a raper). Mark whole track and hit OK.
Next one is Reverb->Reverb choose witch one preset you like and hit OK.
Next one is Filter and EQ->Graphic Equalizer-> Lead vocal-Presence and Clarity
Then click on Parametric Equalizer->choose which one you like
Next one is Amplitude and Compression-> Hard Limiting/process. Then follow this settings
Limit Max amplitude to -6,5
Boost input by 1,8
Look ahead time 7ms
Release time 100ms
Then all you have to do is set your EQ. Always boost high and middle freq. by 2, and low freq set to -1.

How To Install Vst And DirectX Plugins Adobe Audition

You are surely ask your self how to add Vst And DirectX plug ins to Adobe Audition 3.0. Well that part is easy. Just follow a few steps :
Find a plugin you want to add
Download it or buy it ( I recommend buying because you will always get original and full edition of that plug in, do not trust some "unknown" vst sites, you can get your adobe audition or OS crashed)
If plugin is a .exe file just install it
If yours selected plug in is just .dll then do this.
Create a new folder and call it VST Plug ins or just PLUGINS (whatever you like, important thing is to create a empty folder
If you have more then one plugin then find and copy them to "PLUGINS" folder (just for easy organize)
Open yours Adobe Audition 3.0 software and get your self into "edit mode"
Click on "Effects" on toolbar
Click enable DirectX plug ins
Now go again to "Effects" on toolbar and just click refresh effect list

That is about it. Pretty easy right?
Enjoy in audio mastering

How to use Adobe Audition Effects!

Well, everyone who is just at beginning of learning how to use Adobe Audition 3.0 does not know how to use and get the effect that he looking for.
I well help you as much I can but I also must tenacious.
So lets get started.

1.ECHO -
Most of you guys and girls :) wants to add that very nice and smooth echo to your vocals. Let me Show you how to do that.First mark the part of the track you want to edit Click on effects Choose the Delay and echo And double-click on echo
For nice and stereo echo choose Stereo Vocals and do a lil bit editing, just take a look my screenshot where I made some adjusting.

2. DELAY-
Most of people thinks that echo and delay are the same thing, well they are wrong. Delay effect gives your vocals feedback at full volume. You can you delay on the begging of the song. Some example : Beat starts and you want to add a intro lyrics, so it should be like this : I say YEAH (that "YEAH" will repeat a few times) YEAH yeah....So How to do that? Its very easy follow me : Mark your intro vocals Go to Effects list Choose Delay and echo Pick Delay Choose tap slap and check my screenshot to see my customize settings

3. REVERB-
reverb is a great effects for those who have a low quality mic. Use reverb to add some power and quality to your vocals. Follow me to get a right reverb settings : mark part of your vocals witch you want to edit go to effects Choose reverb open studio reverb then choose Vocal reverb medium That's about it you do not need make and adjust.

4. TIME AND PITCH
Time and pitch you use to make special effect vocal. Like some robotic vocals, devil, a lil baby etc. I like and use Time and pitch very often. So lets get started : Mark vocal part you want to edit Go to effects choose Time and Pitch then pitch shifter Now if you want to your vocals sound like devil then choose Deathly II and check my screenshot to make a little corrections If You want to your vocals sound like a lil baby then go back and choose stretch and pick a raise pitch and check my screenshot to make some correction You can also use stretch to get your vocals sound like a devil, helium, baby faster tempo, lower tempo speed etc. Just a mes a lil bit about it and choose what you like

5. AMPLIFY FADE/PROCESS
This effect is one of most used. Adobe Audition Amplify process is just tool to increase the volume of your vocals. If you have a low quality microphone this effect is made for you. My suggestion is before you start to mastering your vocals use amplify process. Mark your vocal and go to edit mode, then choose "amplify fade/process" effect and double-click on it. Then you chose Center Wave and hit ok. Now again go to "amplify fade/process" and chose 3dB boost. This is a way to boost power from your cheap microphone.

6. HARD LIMITING PROCESS
Well, after you do all mastering you want to do, you must get your vocals in "same line", you do not want to have "peaks" and "puffs". How to eliminate it? Mark you vocal, go to edit mode, chose hard limiting process, and set the settings like this :
Limit Max amplitude to -6,5
Boost input by 1,8
Look ahead time 7ms
Release time 100ms ; hit ok.

7. NOISE REDUCTION
If you have a low quality equipment you must have a lot of noise and "extra" sounds. This effect will help you to eliminate every other sound that you do not want in your song. How to do that? It is very simple. Mark the part of track containing the "unwanted sound", go to effects, and choose "Noise reduction process". Then you will get the small pop-up window. First thing you must to do is select what sound you do not want. Please select that sound and then click on Capture profile, then wait a little. Now when Adobe Audition finished you request you will get some diagram. Now, be careful, you do not want to have that "ROBOTIC" sound of voice right? Follow me to do it right. First click on "SELECT ENTIRE WAVE" then:
your reduction noise level set on 60
Reduce by : 30dB
Precision Factor : 6
Smoothing amount : 1,5
Spectral Decay rate : 60%
Hit ok and that's it.

How To Become Professional Producer Using Adobe Audition

Check Grasak Fuck Audio Production : Download Songs

Lihat tutorial lain tentang Recording

Well, first of all you have to know some basic sound facts. You must learn what is sound, what you can do to change that sound and improve his quality. You must know how each effect will affects the sound. You need learn some true basic, and then work work work and work to improve your producer or D.J. skills. I wrote this hub because many of you think if you know a basic things about sound you are professional producer. Well I do not think so, you can not just follow steps in producing that I did on this hub, OK you can, BUT YOU MUST THINK ABOUT IT HOW ARE YOU DOING THAT. Maybe I am wrong in using some effects, maybe you can get a more quality sound by your own imagination. Most of peoples make mistakes by "copying" what other guys doing. NO! If you want to be somebody one day, you must develop your own way to do that. BE UNIQ!
This hub is most closely to get a professional studio quality sound from your vocals, so you can learn from this, DO NOT COPY JUST LEARN! If you do not get some thing please contact me, send me e-mail or post comment, I will help you.

Friday, April 20, 2012

Style Beats - Series 1

This series of posts will show you actual patterns on the Step Sequencer in many different styles. I also play the drum kit and have worked out a wide range of beat styles and transcribed them into Fruity Loops. These will include everything from standard blues to metal to hip hop, techno, ethnic/world and many others for you to use and build off of. Learning new styles of laying out music will help you immensely with your own FL Studio projects.

Acid Jazz

Check Grasak Fuck Audio Production : Download Songs
View the Original article

LinkWithin

Related Posts Plugin for WordPress, Blogger...
Klik di sini untuk melihat:


Entri Populer

Grasak Fuck Audio Production

Followers

Search Engine

Loading
x

join to my fans at facebook