.breadcrumbs { padding:5px 5px 5px 0; margin:0;font-size:95%; line-height:1.4em; border-bottom:4px double #e2e7b4; } .breadcrumbs a { text-decoration:none; color: #000000; }

G.f.a Productiom

DCM Galeri Headline Animator

Showing posts with label Compressor. Show all posts

Tuesday, April 24, 2012

Recording Dengan ADOBE AUDITION 3.0

BELAJAR ADOBE AUDITION 3.0

Disini saya akan menjelaskan bagaimana cara membuat lagu dengan adobe audition 3.0. tentunya anda harus memiliki instrument lagunya terlebih dahulu. Anda bisa download atau membuat instrument sendiri dengan progam vocal remover.
Langkah-langkahmenggunakan adobe audition:
ini lah tampilan awal adobe audition 3.0.


Pilih file new (akan keluar tampilan seperti gambar di bawah ini) lalu sesuaikan pilihan sample rate dan sebagainya. lalu tekan ok.
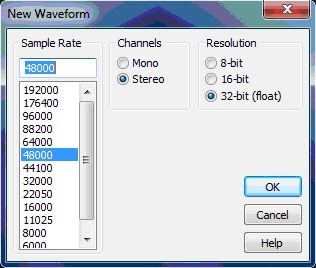


Siapkan microphone anda pastikan memilih microphone dengan kualitasa bagus,untuk menghasilkan suara yang bersih.
Disini saya akan memberi contoh recording lagu MY love (westlife)
Jika anda siap mulailah rekaman dengan mendengarkan instrumen lewat headphone agar lyric dan instrumen bisa balance.


Untuk memulai merekan anda tinggal menekan tombol


Dan bila anda sudah selesai merekam tekan kembali tombolyang sama


Berikut ini tampilan hasil recording awal.
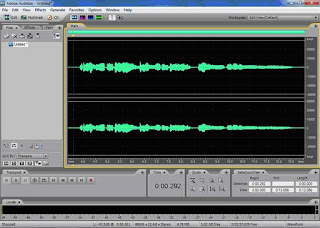


Setelah itu anda harus memberi effec suara dengan cara:
1. Pilih menu effect lalu pilih normalize setelah itu ketik angka 70 atau sesuai pilihan anda.
2. Pilih menu graphic equalizer pilih pada combi box effect present keyboard - bright and clear,lalu tekan ok.
3. Pilih studio reverb pilih combo box.
4. Pilih astering pilih pada combo box effect present make a room for vocal.


Setelah langkah diatas sudah dilakukan,
Buka instrument lagu yang anda nyanyikan tadi, tentukan awal suara masuk lalu pada selection view copy durasinya. Dan pastekan di area recording suara anda. Anda bisa menanbahkan area kosong dengan memilih menu generate lalu pilih silence. Setelah sudah pas maka anda tinggal mix suara anda dengan instrument anda tadi.


Inilah contoh mix lagu :
Pilih edit mix paste
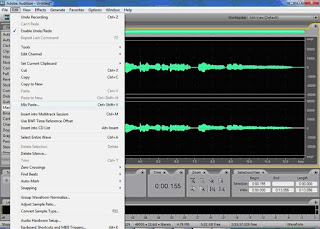


Akan muncul tampilan sebagai berikut :
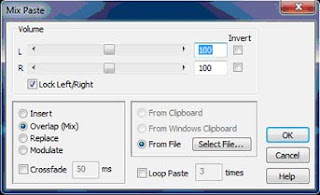


Pilih select file dan cari instrument anda lalu atur volume sesuai dengan keinginan anda. Lalu klik ok


Maka dengan cara seperti itulah suara anda dan instrument akan digabungkan


Cara terakhir yaitu mastering lagu anda agar suara tampak lebih halus.
Pilih effect menu mastering pilih pada effect preset dan pilih default. Lalu tekan ok.

Lihat tutorial lain tentang Recording

Check Grasak Fuck Audio Production : Download Songs

Friday, April 20, 2012

Pump up your Fl Studio Tracks with Fruity Compressor

Compression is one of the most important effects in music and audio production. And the Fruity Compressor is a nice easy to use effect that can be used to help pre-master and give a boost to your tracks.

Now what a compressor does is reduces the dynamic range of an audio signal if its amplitude exceeds a threshold. The amount of gain reduction is determined by a ratio control. For example, with a ratio of 4:1, an increase of 4 dB will be needed to increase the output signal level by 1 dB over the threshold.

What this means is that when you use compression on a Fruity Loops track each channel of audio will become more leveled out with each other. It lets you set up your mix so that each audio channel will fall between and set range; it brings the low volume signals up while keep the higher level channels punchy boosting the overall gain of the track without exceeding the dynamic level and clipping.

In FL Studio the Fruity Compressor has six controls: threshold, attack, ratio, release, gain, and type.

Threshold - Sets the dB level at which the compressor kicks in (with a range from 0.0 to -60.0 dB). The threshold should be adjusted according to the relative input level and the type of audio material. Once the threshold level is reached, compression will start, reducing the gain of the input signal according to the current Ratio, Type, Attack and Release settings.

Ratio - Controls the amount of compression (gain reduction) that will be applied to the signal once the threshold level is reached (with a range from 0.4:1 to 30:1). Ratio denotes the difference in dB between input level and output level, i.e. how much the signal above threshold level will be compressed (or expanded, at ratios below 1:1). For example, a ratio of 4:1 means that when the input level increases by 4dB, the output level of the signal above threshold will only increase by 1dB.

Gain - Controls the amount of make-up gain to be added or subtracted from the compressed output signal (with a range from 30.0 to -30.0 dB). The gain should be adjusted to normalize the signal amplitude after compression, or to control the amount of limiting.

Attack - Controls the time it takes to reach full compression once the threshold level has been exceeded (with a range from 0.0 to 400.0 ms). A fast attack setting means that compression will be more or less instant. Using a slower attack setting results in the compression being gradually increased, allowing for more variations in the signal than the fast setting. Attack should be adjusted according to the nature of the audio material.

Release - The Release parameter sets the time the compressor takes to stop acting after the level has fallen below threshold (with a range from 1 to 4000 ms). Short release times will make the compression more flexible and able to adapt to the input signal, but can cause fast changes in gain that may sound displeasing. Longer release times produce a signal with a more even level and less distortion, but make it harder to maximize the overall compression because small variations in signal level will be ignored.

Type - This parameter controls the knee type and TCR. The possible values are: Hard, Medium, Vintage, Soft, Hard/R, Medium/R, Vintage/R, Soft/R. The knee determines the dB range above and below the threshold where the compression goes from 1:1 to the selected compression ratio. A hard knee setting means that compression will take place immediately after the threshold level is reached, whereas a soft knee setting indicates that compression is gradually applied over a range in the signal.

Here's a great page explaining the use of compression in greater detail: Compression-Limiting

Experiment with the compressor in your FL tracks and stayed tuned for Using Fruity Compressor part 2 for more info and tips on using it in your FL Studio projects.

Check Grasak Fuck Audio Production : Download SongsFruity Loops - FL Studio REsource posted by Editor at 7:58 AM

View the Original article

LinkWithin

Related Posts Plugin for WordPress, Blogger...
Klik di sini untuk melihat:


Entri Populer

Grasak Fuck Audio Production

Followers

Search Engine

Loading
x

join to my fans at facebook